
MORE CADILLAC PROJECT
With the 2005 Cadillac STS still on the hoist the engine and front suspension is removed in preparation for the permanent parts to go into the 41. The hood and front clip was removed then all the cooling, brake , A/C lines disconnected and cable harnesses , where necessary disconnected.
 I put my body dolly, that I had built, to fit the front subframe, engine and transmission of the 05 then lowered the car so the subframe sat on the dolly, took the 6 bolts out of the subframe and the 10 bolt's from the top of the struts and lifted the body up using the hoist.
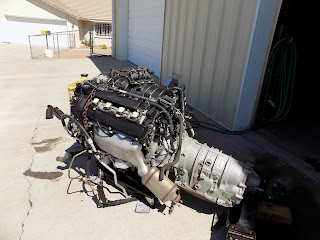
 As you can see the engine / suspension assembly comes out as a complete package including all the wiring harness and lines. Although it was very heavy it moved very easily on the large wheels of the dolly across the shop to under the chain hoist where the engine / transmission was separated from the subframe / suspension.

 The large components were moved outside, sprayed with degreaser and Simple Green, then washed with a power washer.


 I removed the 07 subframe, that I had made alterations to, and put the 05 unit in its place complete with all the brake lines in place.
 The 07 subframe was set aside just encase it might need to go back in if the stock 05 does not work out.
 The 05 radiator assembly was set in place and the 41 front support assembly bolted in. I had previously moved the radiator back 4"to clear the grill support and it now needed to be moved back to the stock position.
 There was about 3" of metal and space just behind the grill support & in front of the condenser that had to be cut away to make the stock set up work, so I reinforced that area with a heaver metal angle then cut the sheet metal for clearance.
 Here you can see the new front cross member and the 41 main support for the front fenders and grill with the stock 05 radiator, condenser and fan assembly in place that still leaves plenty of room in front of the engine.

 I took my time welding it in skipping around to different locations to prevent warping.

 The rest of the fire was sanded and will be filled in preparation for finish paint on the bottom 2/3rds leaving the top 1/3rd in prime for paint when the car is painted.
 This is a build as you go project so I will see what I need to do next when the time comes.


The 05 parts are in very good condition - better than the 07.


I wanted to finish the fire wall to start putting the permanent parts in place and made the decision to not use the cowl vent. The under dash brackets were removed and the vent cut down then leveled in place with magnets.


I will use body filler to finish smoothing the area out then block sand.


Comments