Posts

Showing posts with the label 1941 Cadillac with 2005 Cadillac interior

4105 CADILLAC INSTALL HOOD / RAISE SEAT

Image
With the front end of the 41 Cadillac bolted together it was time for the hood.   All of the hood trim brackets and screws were put into the bead blaster to remover the rust.  The side vent grills and top center hood chrome (with the "Flying Goddess") were cleaned up and the rusted screws were drilled out and holes rethreaded. The hood ornament is also the hood latch/opener.  The hood brace was assembled & installed with the hood opening springs. I used the overhead hoist & straps, to get the right angle that matched the support brace, to move the very heavy hood into place and installed.  The support bolt holes are slotted the allow adjustments to be made, however the hood still has to go back another 1/2"  With the hood on I could not see over it when I sat in the drivers seat & determined that the seat should be raised 4". The front of the seat goes into slots and the rear is bolted down. 4" heavy boxed tubing was cut 4 ...

Make the Lights Work on the 4105 Caddy

Image
The front of the 41 Cadillac still needed to be assembled and I started with the front fenders, gravel pans then the grill and bumper. The grill has parking /  turn signal lights in it and the fenders have head lights that need to be repaired then wired in to the 2005 wiring harness.  The parking lights were not into bad of condition at least all the parts were there. They were put in the bead blaster to be cleaned up the housings were painted with the chrome and glass scrubbed clean. the gaskets are destroyed but I will worry about then later.  The light sockets are usable with bead blasting, paint and heat shrink tubbing on the existing wire. The socket base spring loaded terminals were frozen and had to be soaked oil overnight to get them worked free. Then the wires were extended to be long enough to reach the 05 wire harness.  The 05 wire harness wires were tagged for the hi/low beam,  parking light and turn light by turning them on at the dash swi...

Custom Built Bumper for the 4105

Image
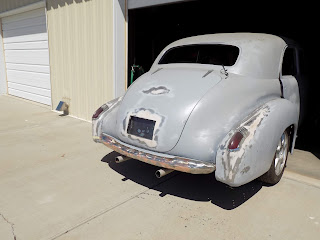
The existing bumper looked out of place at the back of the 41 Cadillac and I decided to modified it to fit in close to the back between the rear fenders. (The picture below is the finished reshaped bumper.) The stock bumper was set in place and as you can see dose not fit the back of the car. It was marked for center and where the first cuts will be made. This is a cut and fit as you go to get the look that I want.  Once the ends were cut off it could be slid under the gravel pan and scribed for the curve of the back of the car.  The top part of the bumper was cut off and I got part of the curve but still not enough.  7 cuts were made on top & bottom so it could be bent into the curve shape.  I bent a 1"X 1" square tube to match the curve of the gravel pan then clamped it to the bumper as it was pulled and bent to match then welded the top first as it was bent into place. The bottom was bent as necessary, clamped at each cut then welded. ...