
69 MUSTANG RUST REPAIR
With the driver's door post damage repaired I started on the back of the car where most of the rust is, removed the rear bumper, trunk lid, tail lights & housings and gas tank. The gas tank was beyond saving with about 2 lbs of rust in it and the sender rusted in place so it was put in the scrap pile and a new tank & sender ordered. When the tail lights were removed the rusted metal between the lens's came out with them, the bottom of the tail light panel and the rear gas tank support brace were badly rusted. I checked and found that replacement parts were available then removed the tail light panel and other rusted parts.
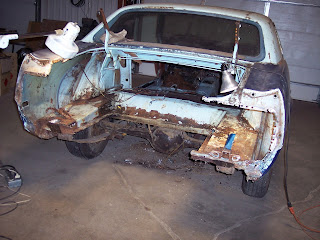 The rusted areas at the back of the car were sand blasted to determine how much metal had to be replaced.


 The rear of the trunk floor pans rusted out at the bumper supports above & below.
 The rear corners of the trunk opening rusted through. The right side is fixable the left must be replaced.


To get access to the spot welds at the bottom of the rear fender the rear end and springs had to be removed. The break drums were rusted to the axle and I had to make a drum puller as the gear pullers I have did not have a large enough span. Even with the puller in full force I had to use the torch to heat it up be for it break loose.

 This is the patch welded in place. The bottom of the fender and wheel well still had to be fixed.

The new parts came right & left trunk floor pans, rear trunk brace / gas tank support and tail light panel.
 The tail light supports, trunk latch bracket were removed from the old tail light panel then bead blasted primed & painted along with the bumper supports.
 All the brackets had to be located and welded to the new tail light panel.


The tail light panel rusted out on both sides.

Lower rear fender behind the wheel rusted in to the wheel well.


Once the trunk floor pan was removed I could see how bad the rust damage was at the bottom of the rear fender just behind the tire (looking from the trunk at the inside of the rear fender).


A pattern was made then the patch cut and fit at the rear fender.


New trunk floor pan in place and the bottom of the fender and back of the wheel well fixed.


Above & below the floor pans and trunk brace have been replaced.

The tail light panel fit very good and did not take much adjusting to get it in place.

The back of the car is back together with the left trunk corner left to be fixed, there is not a 69 replacement corner available so I bought a 68 corner and did some surgery on to get it to fit.

The first 4 weeks and 100 hours has gone whizzing by and the fun has just begun.
Last week we took the transmission to Phoenix for rebuild and to visit the Starliner with the upholstery just about complete then back to Hot Rods by Dean to finish it up for the Good guys show Nov. 20 to 22 in Scottsdale.
.JPG)

Comments